EDITING & MANAGING YOUR MEMBER PROFILE
The MANAGE MY MEMBER PROFILE page allows each member to perform the following tasks:
– Edit and maintain the business information that will display to the public on your Maine Made Profile: (Business Name, Member Snapshot / General Description of your Product, Product Category, Contact Information, Links & Social Media and other classifications).
– Assign your business to any pre-selected events that have been entered into our website by Maine Made staff (see more on this below).
– Edit, re-crop and reorder existing member images. Replace existing member images by uploading new replacement images.
To navigate to this page, first visit Member Resources:
www.mainemade.com/member-resources
…then click on the green MANAGE PROFILE button in the cell to the left on this page.
MANAGING YOUR INFORMATION
Once you login and arrive at your MANAGE MEMBER PROFILE page, you have the capacity to edit every field on the page. Once you have made all desired edits by typing new information into the corresponding fields, simply click the light brown APPLY & SAVE CHANGES button at the bottom of the page to publish the edits to the website. If you do not click this button before leaving the page, any and all changes will be lost.
PLEASE NOTE:
– All urls should be preceded by http:// or https://
– “Where To Purchase” Locations should be limited to a total of 4 locations and should appear in this format: Business Name – Town, State
ASSIGNING YOUR PROFILE TO EXISTING EVENTS
The staff at Maine Made maintains an ongoing database of relevant events around the state that are commonalty attended by program members. Once an event has been added by our staff into our database, it appears to the public on the front end of the site in the Events area. It also appears in a two column list on your MANAGE MEMBER PROFILE page allowing your to assign yourself to this event if you have registered for it.
Assigning yourself to an event will allow public users who are viewing event details on the Maine Made to see that you will be in attendance. It is a good idea to keep this list up to date and to check back regularly to assign yourself to newly added events.
To assign your profile to an existing event:
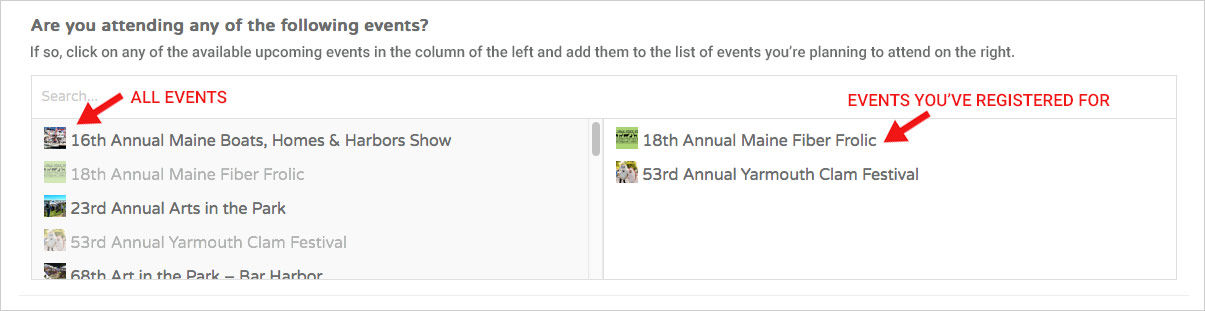
1. Scroll down to the 2 column list interface on your MANAGE MEMBER PROFILE page entitled “Are you attending any of the following events?”
2. The list on the left shows displays all upcoming events that have been added to the site by our staff. The column on the right will display events that you have assigned yourself to once selected and once you’ve clicked the APPLY & SAVE CHANGES button.
3. To assign your profile to upcoming events, find an event in the list on the left that you have registered for and click on it to add it to your list on the right. Proceed by adding all relevant events to your list. When you’ve completed the process, click on the APPLY & SAVE CHANGES button at the bottom of the page to publish your changes to the website.
PLEASE NOTE:
– If you are attending an event that is not listed in the staff chosen list on the left that you feel we should be aware of, please visit our Suggest An Event page to provide us with details for consideration:
MANAGING YOUR MEMBER IMAGES
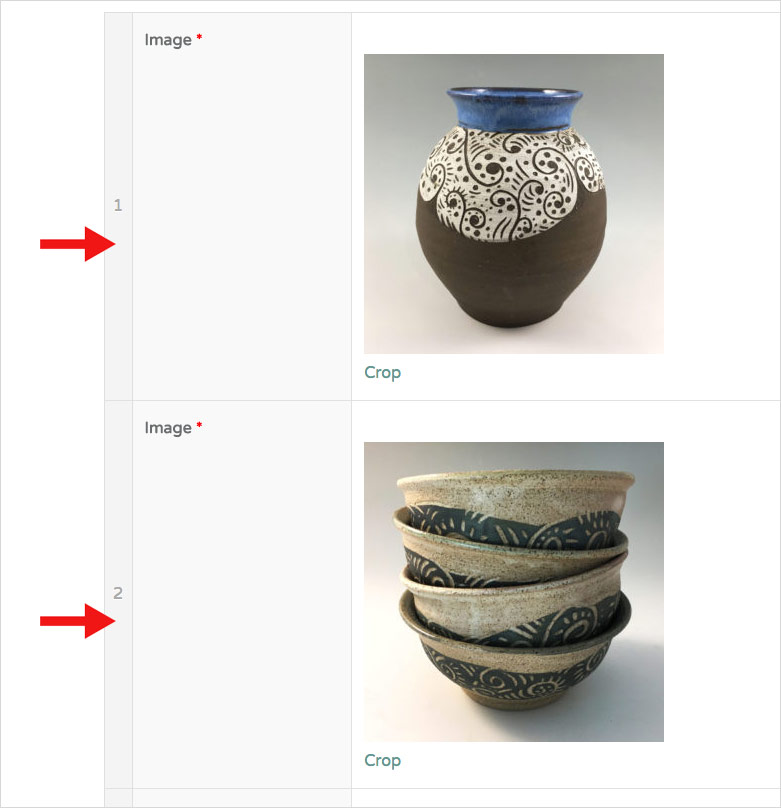
Your existing member profile images are displayed vertically via associated thumbnails near the bottom of the MANAGE MY PROFILE page. You can display up to 4 images on your profile at one time.
Recropping:
All images displayed on your profile will be cropped to a perfect square by the site’s code. If you’d prefer an alternate crop on an existing image, you can recrop the image by following these steps.
1. Scroll down to the image you wish to recrop.
2. Click on the green link labeled “Crop” at the bottom left corner of the image’s thumbnail.
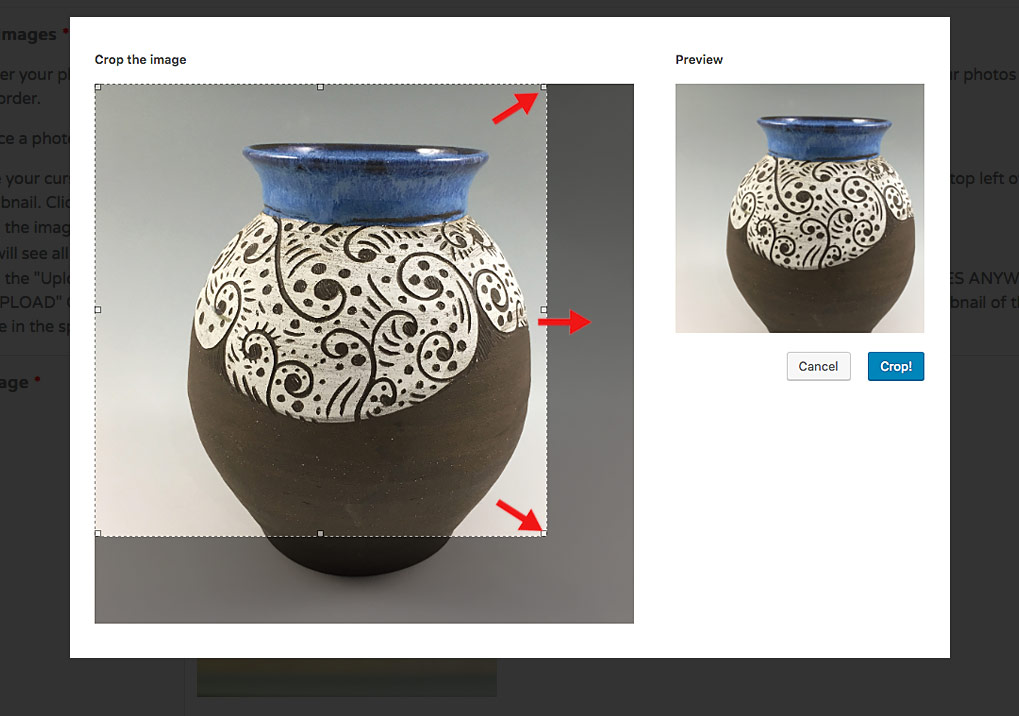
3. On the corresponding pop-up window, you will see the image displayed with an animated marquis selection over the top right corner of your image. You can move this marquis selection around your image by selecting within the marquis area and moving it up, down, left or right to the desired position. You can also increase the size of the marquis selection by clicking on any of the 4 miniature squares in the far corners of the marquis selection and dragging the corner out thereby making the selection larger. The preview in the window to the right of your image will give you an idea of what your crop will look like when complete. Keep in mind that the aspect ratio will always render to a perfect square. You cannot change the shape of the selection, only the size.
4. Once you are satisfied with your new crop, click on the green “Crop!” link to the bottom right of the preview thumbnail in the column to the right of your image.
5. Once the system has completed the crop, the pop up window will close.
6. As always, click the APPLY & SAVE CHANGES button at the bottom of the page in order to commit the new crop and publish the revised image to the website.
Reordering Images:
To reorder your photos…
1. Click on the gray vertical bar to the left of the image thumbnail that you’d like to reorder and move it up or down until your photos are displayed vertically the desired order.
2. As always, click the APPLY & SAVE CHANGES button at the bottom of the page in order to commit the new crop and publish the revised order to the website.
Replacing photos if you are displaying the maximum of 4 images:
1. Place your cursor over the thumbnail of the image that you’d like to replace until you see the pencil and the “x” icons appear at the top left of the thumbnail.
2. Click the “x” to delete the image.
3. Once the image thumbnail is removed, you will see the words “No image selected” followed by a green “Add Image” link. Click the “Add Image” link.
4. If the “Upload Files” tab will is displayed by default*, with the “Upload Files” tab selected, drag and drop the new image into the white area below the tabs where you see “DROP FILES ANYWHERE TO UPLOAD” OR click on the “Select Files” button to navigate to the new image file saved on your computer. Once you see the thumbnail of the new image in the space below the tabs, make sure it is selected and displaying a blue border around the image and a blue checkbox at the top right of the thumbnail of the new replacement image.
* If the “Media” tab to the right of the “Upload Files” tab is displayed by default, click on the “Upload Files” tab to and proceed.
5. Click the blue “select” button in the bottom right corner of the window to add the new image.
6. On the corresponding pop up screen, select your desired crop and position by moving and resizing the marquis tool. Commit the crop by clicking on the blue “Crop!” link to the bottom right of the preview thumbnail in the column to the right of your image.
7. Once the crop is complete, the pop up window will close and you should see the new thumbnail shows on the corresponding page.
8. Scroll up until you see the blue Update button at the top of the page in the right column. Click on this button to publish the new photo to your page.
9. Visit your page on the site to verify that your desired changes have been published and are appearing to your liking.
Adding new photos if you are displaying less than the maximum of 4 images:
1. Scroll down to the list of thumbnail images and look for the green “Add Profile Image” at the bottom right corner of the row that contains the most recent thumbnail.
2. Click on the “Add Profile Image” link which will add a new row below the existing row containing the previous thumbnail. You can add multiple rows with this process as long as you do not exceed the maximum number of 4 rows or images total.
3. In the new empty row, click on the green “Add Image” link to the left of the “No Image Selected” notice.
4. If the “Upload Files” tab will is displayed by default*, with the “Upload Files” tab selected, drag and drop the new image into the white area below the tabs where you see “DROP FILES ANYWHERE TO UPLOAD” OR click on the “Select Files” button to navigate to the new image file saved on your computer. Once you see the thumbnail of the new image in the space below the tabs, make sure it is selected and displaying a blue border around the image and a blue checkbox at the top right of the thumbnail of the new replacement image.
* If the “Media” tab to the right of the “Upload Files” tab is displayed by default, click on the “Upload Files” tab to and proceed.
6. Click the blue “select” button in the bottom right corner of the window to add the new image.
7. On the corresponding pop up screen, select your desired crop and position by moving and resizing the marquis tool. Commit the crop by clicking on the blue “Crop!” link to the bottom right of the preview thumbnail in the column to the right of your image.
8. Once the crop is complete, the pop up window will close and you should see the new thumbnail shows on the corresponding page.
9. Scroll up until you see the blue Update button at the top of the page in the right column. Click on this button to publish the new photo to your page.
10. Visit your page on the site to verify that your desired changes have been published and are appearing to your liking.
WHAT ARE THE IMAGE FILE DIMENSION AND RESOLUTION SPECIFICATIONS FOR THE PHOTOS THAT I PLAN TO UPLOAD?
Please submit up to 4 image files in JPG format that are set to a resolution of at least 72dpi (dots per inch or sometimes referred to as pixels per inch). Image dimensions should be a minimum of 1,080 pixels wide by 1,080 pixels high. If your image is smaller in width than 1,080 pixels or smaller in height than 1,080 pixels, it will be rejected by the site. If your image is larger in width or height than 1,080, please be aware that it will be cropped to a square. The resulting cropped photo will be centered both vertically and horizontally. It is therefore in your best interest to upload photos in which crucial subject matter is as centered as possible.
For more detailed info, specs and resources regarding images, visit our MEMBER IMAGE PREP FAQ page.
IF YOU HAVE QUESTIONS OR IF ALL ELSE FAILS!:
If you are struggling with or need extra guidance with any of the methods suggested above for identifying image dimensions and resolution, please feel free to email our support team at: